Saturday 2 December 2023

The Shores of Infant Sea: Art exhibition at Nuneaton Art Gallery


An art exhibition for toddlers and young children runs from 17 November 2023 to 18 March 2024.


This exhibition shows oil paintings from Rachel Shirley’s children’s books:

Katie’s Magic Teapot and the Cosmic Pandas

Katie and the Pandas’ Deep Sea Voyage

And Ben’s Little Big Adventure.


Art Exhibition for Toddlers

The exhibition consists of oil paintings from my three children’s books.

The aim of this exhibition is to introduce children from toddler age to art galleries. The paintings show a child of three learning about the world from her flying teapot.

Another book describes a little boy’s quest for a midnight snack.

The aim of this exhibition is to bring young children to exhibitions.

Without realising, clues to my own toddlerhood have eked into these paintings.


Andy Pandy and Teddy of My Toddlerhood

The ‘panda’ come from Andy Pandy, a BBC children’s programme I would have watched in toddlerhood. This is due to the sound-echo. A teddy bear, and ragdoll (like Ted and Looby Loo) also appear.

The space aspect comes from the Moon Landings in July 1969. A lot of space exploration was on TV in my toddlerhood.

Waking up to the world is like coming to sand from the sea. This is where the oceans come.

The teapot symbolises home and family. People often gather around a teapot. Here, it becomes a vessel in which to explore.

Opening Time Winter hours

Thursday 11am-3.45pm

Friday: 11am-3.45pm

Saturday: 10.30am-4pm

Raising Money for Barnardo’s

I aim to exhibit these paintings before selling them at an auction or finding them a home where they can brighten up a public space. All moneys will go to Barnardo’s.

I am now using my art to raise money for Barnardo’s.


Link to Rachel Shirley Books Online

Katie’s Magic Teapot Omnibus Edition

Ben’s Little Big Adventure

My Author Page on Amazon

My YouTube Channel

Tuesday 15 February 2022

How to I Treat Craquelure in my Oil Painting?

 Craquelure are fine hairline cracks that appear in an old oil painting. Some art restorers may not decide to treat it, for is the normal process of ageing and adds charm to the appearance of the artwork.

This old oil landscape painting shows cracks in the paint layer called craquelure. This is caused by the aging process of the oil paint that has dried out over time. The proper preparation of gesso will minimize the appearance of these cracks.

A close up of this painting showing craquelure.

Image right shows distortion in the canvas due to botched restoration. Masking tape had been stuck onto the back of the canvas to hide a hole. Sadly, the resultant stresses in the canvas have exacerbated the cracks.

Any restoration work would now require extra care.

The image shows the painting after I had removed the offending masking tape and repaired the holes in the canvas. I had also tensioned the resultant flabbiness in the canvas by adjusting canvas keys in the back of the painting. My other article explains how I had restored the surface of this painting.

This article is about how I patched up an area of craquelure.

Cracks in the Oil Paint

The images show the oil paint flaking off after I had removed the sticking tape from the back of the canvas and repaired the holes.

My aim isn’t to hide all the cracks in the oil painting, but to restore only this particular area. As can be seen, bare canvas is exposed. This painting hadn’t been prepared properly and the oil paint has dried out over time.

Fortunately, the neighbouring oil paint remained sound and I could work into the area concerned. But any loose paint should be removed. The bare canvas beneath can be prepared with gesso primer before restoration.

Any large pieces of flaked-off oil paint can be glued back on with impasto medium if possible, but this could be a lengthy process.

The bare canvas showing beneath the paint. Image right: applying gesso.

First, I applied a little acrylic gesso primer onto the bare canvas. A fine sable is needed for careful application. The gesso provides a stable surface onto which to apply the oil paint on top.

The oil painting prepared for restoration.

All the areas of bare canvas have been touched up with the acrylic gesso primer. I can now apply the oil paint onto the areas where the oil paint had flaked off.

Treating the Craquelure.

Once the gesso primer is dry, I will place onto a palette the required oil paints and a little impasto medium.

Impasto medium is an alkyd resin that thickens the oil paint and accelerates its drying time. It’s great for impasto effects and works like Polyfilla for oil paintings. Any indentations can be smoothed out for an even finish.

For this painting, I used ultramarine, olive green, burnt sienna and a little cadmium yellow.

I mixed a little of the impasto medium into my paint mixture and applied it over the damaged area.

A vast array of neutral hues can be achieved with just a few oil colors.

I will work over the damaged area a little at a time with soft sables for a smooth finish. Work the paint in various directions to create evenness in the paint layer.

Images show how I worked over the cracked areas of an oil painting.

The images show how I worked over the damaged area in stages to bring the paint layer in line with the surrounding area.

Scars in the oil paint layer will show at first until smoothing it over in stages. Any ridges can be smoothed over to bring a more consistent finish.

At first, the scars beneath will be evident. Thin layers of paint on top will add integrity to the paint layer.

Images showing restoration in stages. The scars in the paint layer will eventually fade with careful blending.

Image left shows touching up on a damaged area near the corner of the painting. Image right shows an area of matt on the area worked on. Varnishing will bring the finish in line with the rest of the painting.

The image shows the unsightly lump caused by the masking tape is gone and the painting correctly tensioned. The craquelure has also been treated locally.

Images shows the painting restoration complete.

Relevant articles

Repair a hole in an oil painting

Hide a defect in an oil painting

Repair a tear in an oil painting

Monday 14 February 2022

Repair a Hole in a Damaged Oil Painting

 This oil painting had undergone a botched attempt to hide a hole in the canvas. This old master had masking tape stuck to the back, and as a result, had warped the shape of the canvas, spoiling the look of the oil painting.

And old master landscape painting by Willis Pryce.

As can be seen, this oil painting by Willis Pryce looks okay when viewed head-on under even light. But view it from the side, and the warp becomes noticeable. The closeup shows a hole in the canvas.

Warped canvas caused by masking tape on the back of the painting.

Notice also the cracks in the oil paint layer. This is called craquelure and can be an appealing feature of an old oil painting. The old canvas is indicative, for the cracks follow the stresses of the canvas beneath.

Sadly, I would soon discover, the oil painting hadn’t been prepared properly, for no primer had been applied beneath the oil paint.

An oil painting requires gesso primer prior to applying the oil paint. A bare canvas or wooden panel will suck the oils from the paint, causing the paint to dehydrate, brittle and crack. Worse, the flexible canvas, is not compatible with oil paint that lacks suppleness.

This painting had no primer applied onto the canvas. Hence cracks. This isn’t good.

Masking tape stuck on the back of this oil on canvas has pulled the canvas out of shape.

Removing the tape from the canvas.

Step 1: The tape had to come off. Here, I turned the canvas onto its front and worked carefully from the back. Sadly, the tape wouldn’t peel off easily. A little water was necessary.

I applied a little water onto the area and gently scraped the tape off with a blunt palette knife. Great care is needed to avoid further damage. The cracks in the paint were also a concern.

I allowed the water time to soften the glue and worked steadily from the edges.

The offending masking tape is removed to the bare canvas

Step 2: During the work, I removed the glue, enabling me to work onto the lower layers of the tape. Gradually, the tape came off. The bare canvas is exposed from the back. The hole is laid bare and the distortion gone. The horrible square shape is no more. The canvas has reverted to its flatness.

Oil paint flaking from the canvas due to poor preparation.

Step 3: The hole in the canvas is laid bare. Notice the cracks in the paint layer. The image shows bare canvas beneath the oil paint layer. The painting is fragile and extra repair work is needed.

Minimal damage to the oil painting due to care.

The images show the touch-up required after working on the back of the painting. The cracks in the paint layer warns of oil paint brittling over time. The canvas beneath has sucked the oils in the paint dry. Extra work will be needed to correct this area of craquelure.

Repairing the holes in the canvas layer.

Step 4: The first thing to do is to repair the holes in the canvas.

My article on repairing a tear in canvas demonstrates never to use thick material to repair an oil painting, as suggested on some websites. This will warp the shape of the canvas. Instead, I used thin, but strong undyed (or neutral-colored) linen cotton. I traced out the size required and cut shapes that follow the contour of the holes. I fanned out the edges, to prevent unwanted ridges forming on the canvas as the glue dries.

Applying the glue onto a mixing palette and applying a little water onto the canvas first.

Step 5: I applied strong fabric glue onto a palette and, with a fine brush, applied a little water over the area for repairing. This will encourage the glue into the weave of the canvas. I then dabbed the glue onto the linen shapes and spread it evenly to the edges.


Patching over the damaged canvas.

Step 6: There are two holes, so I prepared two pieces of cotton linen, both in star shapes. After spreading the fabric glue evenly over both, I grafted the pieces over the hole. The glue won’t dry immediately, so there is time to adjust.

Once the fabric is in place, I will rest the painting onto its front. A clean, firm resting platform will need to be prepared. Greaseproof paper on top will protect the painting.

I will leave the glue to dry over a day. But ten minutes later, I will check that all is well before leaving it.

The offending distortion is gone, and the holes repaired. but extra work is needed.

As seen, the horrible shape is gone. But the canvas requires tensioning, as there is now too much give. The tape has pulled the canvas and once removed, has left the surface ‘flabby’.

Canvas Keys

Turn the painting on its back and in the corners, you may find four pieces of wood sticking out of slots. These are called canvas keys. These enable tensioning of the canvas. Here, I gently tapped each key a little further into the slot. Care is needed as the wood is a little aged.

As the canvas is generally flabby, I tapped each corner in equal turn until the canvas is correctly tensioned.

The painting being old, shouldn’t be as tight as a drum, but nicely tensioned with a little give.

The canvas is now tensioned, and cotton linen grafted nicely over the holes. The next stage is the touching up.

The image on the left shows the holes in the canvas prior to repair work. The image on the right shows the repair complete, ready for the touching-up.

My next article shows how I completed this restoration.

Relevant articles

How to treat craquelure

Repair a tear in an old master oil painting

Hide a defect in an oil master

Friday 11 February 2022

Hide Damage to an Oil Painting Old Master

The canvas of this old master oil painting has been torn.

How does the art restorer hide damage to an oil painting? This article shows how to completely hide a tear.

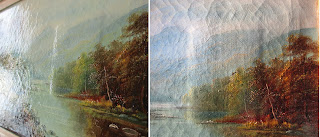
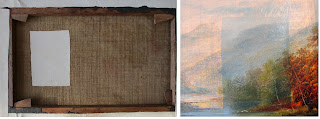
The images show the tear in an old master oil painting completed previously. Lower images show the tear from the back. Image bottom right shows the tear repaired. But the tear remains invisible and requires touching-up with oil paint.

As can be seen, before applying paint to a damaged oil painting, the canvas must be repaired and the surface stable. My previous article shows how I repaired a tear in this canvas.

Touching up a Tear

The painting has been repaired (see my other article on how to repair a torn canvas), but the damage remains visible as a scar. How does the art restorer completely hide the scar?

Materials required for this project are:

Brushes: A selection of fine sables, from 3 to 6. A soft flat (3-6) is good for blending. Rounds are good for getting into detail.

Acrylic paint or artist gesso: The standard white gesso is used for priming over canvas. I opted to use acrylic paints for the underpainting. This means fewer layers of paint are needed to hide the white gesso when I apply the oil paint on top.

Oil paints: A selection of oil paints for the overpainting.

Artist’s spirits: to clean the brushes. I used washing-up liquid in warm water or soap.

Impasto medium. This is a thick alkyd resin, that works rather like Polyfilla for oil paintings. It will hide dimples and blemishes for an even finish. Don’t be put off by the brown color. It will not affect the colors you are mixing with.

Mixing palette: A shallow lid or old saucer on which to mix your colors.

Rags.

A magnifier or good glasses.

Artist clear picture varnish for finishing off.

Preparing the Damaged Area

Gesso primer must be applied onto the canvas before the oil paint. It provides a stable surface, where the oils cannot sink into the thirsty canvas beneath.

I opted to use regular acrylic paint to seal the bare canvas. This is just as good, and less underpainting will be required. 

Applying the acrylic underpaint onto the bare canvas.

Color Matching on Canvas

At this stage, getting the colors spot-on is not essential, for you are simply underpainting over the damaged area to provide a stable surface.

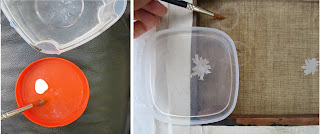
The hues of most old master landscapes are sombre, and few colors are needed. The secret is to aim for neutral colors.

For landscapes, I have found the following oil pigments useful:

Burnt sienna, burnt umber, raw sienna, black, French ultramarine, green (viridian, olive or pthalo green will do), cadmium and lemon yellow.

For the sky: Ultramarine, yellow ochre and cadmium yellow.

Titanium white in varying amounts is always needed.

For the underpainting, I used a blend of yellow ochre, pthalo green, burnt umber and cerulean blue.

The images show an array of neutral colors that can be achieved with just a few oil pigments.

Applying the Oil Paint

Allow the acrylic paint to dry completely. This shouldn’t take long.

Now for the overpainting. This will provide the finish.

Onto a mixing palette, carefully mix the oil colors. Here, I used yellow ochre, cerulean blue, burnt umber and olive green. I added a little white and the impasto medium.

With a fine round sable, I mixed the required color and added a little impasto medium to fill indentations.

Applying oil pigments mixed with impasto medium and smoothing over with a finger.

Impasto medium accelerates the drying time of the oil paint. Here, the paint will be completely dry in a about four hours. This provides ample time to work over the paint layer and perfect.

Mistake of Using Different Oil Painting Mediums on the Same Oil Painting

If things don’t work out before the oil paint dries, don’t be tempted to add linseed oil to slow the drying time. Being conflicting in nature, will cause instabilities in the oil paint layer. It’s best to gently remove the unwanted paint with a rag and work on top again with the same medium.

Blending and Blending

Fine blending is essential to get it right. The tip of my finger worked quite well in getting a smooth finish. This will take time and another session will be necessary.

View the painting via a strong sidelight. This will reveal blemishes in the oil paint unseen under flat light. The images show.

These ultra-close ups under a strong sidelight shows up the scar. The colors match, but the scar remains. Work towards a seamless finish by regularly checking under this sidelight and a magnifier.

You can’t go wrong if the repair work looks good under sidelight.

Perfecting the Restoration

I blended and blended with a little more of the impasto medium, sometimes on separate days. Move the brush in various directions with required tint.

Don’t be tempted to work onto neighbouring areas of the painting if the color doesn’t quite match. Keep the work local and only within the damaged area via accurate color-matching.

The images show continual improvement. See how the scar is less visible.

Blending over the damaged area is the key to creating a perfect finish. The scar is softening and becoming less noticeable.

Once the paint dry, I will touch up with a tiny amount of artist’s picture varnish. This will bring consistency to the finish. If the painting is matt, a matt varnish can be used instead.

Use materials only designed for art purposes.

The images show the restoration complete. The tear can be seen on the image left. Repair work was necessary before touching up with oil paint. The image on the right shows the damage after repair. The damage cannot be seen.

Relevant articles

How to treat craquelure

Repair a hole in a damaged painting

Repair a torn canvas in an old master

Thursday 10 February 2022

Repair a Damaged Oil Painting: Dos and Don’ts

An oil on canvas can be easily damaged during transit or stored inappropriately. A tear can work into the canvas if resting against a sharp object, and the weave, fray if under undue tension. Damp, sunlight and temperature extremes can rob the canvas of natural oils and therefore cause the canvas to brittle and liable to tear. How does the artist repair a torn oil painting?

An oil on canvas can be easily damaged during transit or stored inappropriately. A tear can work into the canvas if resting against a sharp object, and the weave, fray if under undue tension. Damp, sunlight and temperature extremes can rob the canvas of natural oils and therefore cause the canvas to brittle and liable to tear.
How does the artist repair a torn oil painting?

Save Money on Art Restoration
Art restorers can be costly and hard to find. But I have fixed this oil painting myself. The damaged painting is an old master showing Bracebridge Pool, Sutton Park, UK by a Victorian landscape artist Willis Pryce. The painting is thought to be worth a few hundred pounds.
The Damaged Painting
As can be seen from the images, the tear is quite substantial and in a prominent place, being about 1.5inches long and an inch from the frame. Fortunately, the hole can be knitted together. Repairing a hole is a different matter and I have written a separate article on how to repair a hole in canvas. For now, I am knitting together a tear in canvas.

Grafting over the Canvas Hole
Some websites advise gluing thick material onto the back of the painting for strength. This is a big mistake, and this preliminary demonstration shows why. Here, I have used thick material over the tear and stuck it down with glue.

 
Cutting thick material to size and placing it over the hole.
 
Gluing the material over the hole.

Using thick material to repair an oil on canvas will distort the canvas shape.

Using masking tape to repair an old master with ruin the look of the painting.

The images show how the wrong material will shrink and harden with the glue, warping the shape of the canvas. Notice the round shape of the material pulling the canvas into a raised area. This isn’t good. Wetting the canvas will flatten out the distortion, but the effect is temporary. Once dry, the warp will reappear.

The lower image shows a botched effort with regular masking tape. This had been used to repair a hole in the canvas. The result is a raised square. My next article shows how I made the canvas flat.

The lesson here is don’t use thick material, the wrong glue or masking tape to repair an oil painting. These will distort the canvas surface and ruin the appearance of the painting.
And now for how I put things right.

Repairing an Oil Master
The fabric, as seen, is vital.
Further materials to avoid are wool, those with loose fibers and stretchy fabrics. Avoid fabrics chemically treated, coated or brightly-colored. Un-fast dies could leach into the glue and onto the painting. I opted for thin but strong linen cotton material undyed (although a neutral colour is suitable). This will provide an inconspicuous graft.

Glue Suitable for Repairing Canvas
Another important matter is the glue. The wrong glue could spoil a restoration.
Avoid glues containing solvents or harsh chemicals. A pungent odor is the giveaway. The canvas is organic and should be treated as such. Avoid glues for other purposes, such as for glass or plastics, as these will dry rigid.
A trusted fabric glue is good. Make sure it is acid-free. A good fabric clue will dry water-resistant and flexible. Don’t go for cheap glues or craft glues as these may not adhere.
 

Materials Required for Art Restoration
The following additional materials will be needed.
Scissors.
A blunt palette knife.
Greaseproof paper.
Tracing paper.
Pencil.
A soft brush to apply the glue.
A shallow lid.
A pot of water.
An old sheet would come in useful.
Clear a space for your art restoration. A table or a corner of the room would be suitable.
Removing the unwanted patch from the back of the oil painting.

Carefully, I eased off the unwanted thick material using a blunt palette knife. As the material was thick, it came off easily anyway. This comes to show thick material is unsuitable for repairing a delicate oil painting. Be sparing with water, should this be required, for the damp will seep down onto the oil painting from the back. Great care was used for removing the unwanted material.
Once the material is removed, it is time to rework the area.
 

Step 1: Prepare the space for your restoration project. If necessary, place a sheet over the space. Ensure the surface is sturdy and flat. Prefer a hard floor to a carpeted area.

I wanted to avoid removal of the painting from the frame, so I created a platform where the canvas (face down) can rest. This means I can repair the painting from the back.

An unframed canvas doesn’t require this platform, but still needs a sturdy surface on which to rest.
For my framed painting, I used several large, sturdy books of varying thicknesses, I built a platform to the required height. This ensures the canvas is fully supported whilst the glue is drying. Place a sheet of greaseproof paper onto the surface on which the canvas is resting.
Place the painting face-down.

Make sure the platform is located directly beneath the tear.

Step 2: Now cut your selected fabric into an irregular shape, echoing the contour of the tear. I used tracing paper to plan the shape of the material for grafting.

Ensure the graft will completely cover the tear. I then added glue diluted with a little water.

Step 3: Ensure the material is bigger than the tear itself. I allowed a centimetre or so on each side, as seen from the image. I fanned out the edges of the fabric to allow the glue to shrink without distorting the canvas and to avoid harsh ridges. Here, I cut ‘v’s into my fabric shape.

Place a cherry-sized dollop of glue into a shallow lid. (More may be required if the tear is big). To avoid sticky fingers, I held the material in place with a blunt utensil.

With a soft brush, lightly brush a little water over the fabric. This encourages the glue into the fine weave. Don’t saturate it. Go for a light, damp feel. I then added a little of the glue. Spread evenly over the fabric, aiming for an even feel. Go right to the edges.
Wash the brush immediately afterwards.

Step 4: Ease the grafting material over the hole. I used a blunt edge of a knife to ease the shape into place. The glue won’t dry immediately so you will have a minute or so of play. I shifted the material this way and that until it rested directly over the tear. Add a little additional glue if necessary.

Press the grafted material gently but firmly over the tear, ensuring all edges are stuck down to the canvas. Place greaseproof paper over the area and rest a few books on top. Once the glue starts to adhere (in a minute or two), I checked the front of the painting to ensure the tear is grafted correctly.
Step 5: Leave to dry overnight. The glue will be thoroughly dry in a day, ready for the next step: touching up a damaged oil painting.
 
The image shows the tear repaired and the canvas surface dried flat. No unwanted ridges or distortions can be seen.

As can be seen here, the tear has grafted together successfully, and the canvas dried flat and free of warps. It is now ready for the next stage: touching up with paint. This will render the tear invisible.
My next post shows how to overpaint a damaged painting. This will completely hide the damage.

Relevant Articles