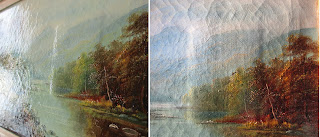
This oil painting had undergone a botched attempt to hide a hole in the canvas. This old master had masking tape stuck to the back, and as a result, had warped the shape of the canvas, spoiling the look of the oil painting.
And old master landscape painting by Willis Pryce.
As can be seen, this oil painting by Willis Pryce looks okay when viewed head-on under even light. But view it from the side, and the warp becomes noticeable. The closeup shows a hole in the canvas.
Warped canvas caused by masking tape on the back of the painting.
Notice also the cracks in the oil paint layer. This is called craquelure and can be an appealing feature of an old oil painting. The old canvas is indicative, for the cracks follow the stresses of the canvas beneath.
Sadly, I would soon discover, the oil painting hadn’t been prepared properly, for no primer had been applied beneath the oil paint.
An oil painting requires gesso primer prior to applying the oil paint. A bare canvas or wooden panel will suck the oils from the paint, causing the paint to dehydrate, brittle and crack. Worse, the flexible canvas, is not compatible with oil paint that lacks suppleness.
This painting had no primer applied onto the canvas. Hence cracks. This isn’t good.
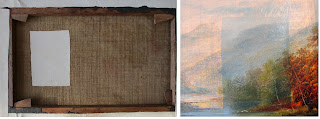
Masking tape stuck on the back of this oil on canvas has pulled the canvas out of shape.
Removing the tape from the canvas.
Step 1: The tape had to come off. Here, I turned the canvas onto its front and worked carefully from the back. Sadly, the tape wouldn’t peel off easily. A little water was necessary.
I applied a little water onto the area and gently scraped the tape off with a blunt palette knife. Great care is needed to avoid further damage. The cracks in the paint were also a concern.
I allowed the water time to soften the glue and worked steadily from the edges.
The offending masking tape is removed to the bare canvas
Step 2: During the work, I removed the glue, enabling me to work onto the lower layers of the tape. Gradually, the tape came off. The bare canvas is exposed from the back. The hole is laid bare and the distortion gone. The horrible square shape is no more. The canvas has reverted to its flatness.
Oil paint flaking from the canvas due to poor preparation.
Step 3: The hole in the canvas is laid bare. Notice the cracks in the paint layer. The image shows bare canvas beneath the oil paint layer. The painting is fragile and extra repair work is needed.
Minimal damage to the oil painting due to care.
The images show the touch-up required after working on the back of the painting. The cracks in the paint layer warns of oil paint brittling over time. The canvas beneath has sucked the oils in the paint dry. Extra work will be needed to correct this area of craquelure.
Repairing the holes in the canvas layer.
Step 4: The first thing to do is to repair the holes in the canvas.
My article on repairing a tear in canvas demonstrates never to use thick material to repair an oil painting, as suggested on some websites. This will warp the shape of the canvas. Instead, I used thin, but strong undyed (or neutral-colored) linen cotton. I traced out the size required and cut shapes that follow the contour of the holes. I fanned out the edges, to prevent unwanted ridges forming on the canvas as the glue dries.
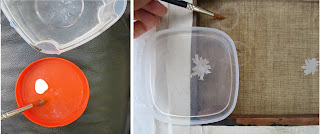
Applying the glue onto a mixing palette and applying a little water onto the canvas first.
Step 5: I applied strong fabric glue onto a palette and, with a fine brush, applied a little water over the area for repairing. This will encourage the glue into the weave of the canvas. I then dabbed the glue onto the linen shapes and spread it evenly to the edges.
Patching over the damaged canvas.
Step 6: There are two holes, so I prepared two pieces of cotton linen, both in star shapes. After spreading the fabric glue evenly over both, I grafted the pieces over the hole. The glue won’t dry immediately, so there is time to adjust.
Once the fabric is in place, I will rest the painting onto its front. A clean, firm resting platform will need to be prepared. Greaseproof paper on top will protect the painting.
I will leave the glue to dry over a day. But ten minutes later, I will check that all is well before leaving it.
The offending distortion is gone, and the holes repaired. but extra work is needed.
As seen, the horrible shape is gone. But the canvas requires tensioning, as there is now too much give. The tape has pulled the canvas and once removed, has left the surface ‘flabby’.
Canvas Keys
Turn the painting on its back and in the corners, you may find four pieces of wood sticking out of slots. These are called canvas keys. These enable tensioning of the canvas. Here, I gently tapped each key a little further into the slot. Care is needed as the wood is a little aged.
As the canvas is generally flabby, I tapped each corner in equal turn until the canvas is correctly tensioned.
The painting being old, shouldn’t be as tight as a drum, but nicely tensioned with a little give.
The canvas is now tensioned, and cotton linen grafted nicely over the holes. The next stage is the touching up.
The image on the left shows the holes in the canvas prior to repair work. The image on the right shows the repair complete, ready for the touching-up.
My next article shows how I completed this restoration.
Relevant articles


No comments:
Post a Comment