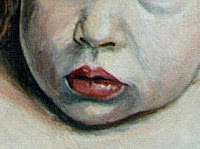
How Not to Paint a Mouth in Portraits
 |
| How to Paint Mouths Rachel Shirley |
- Opting for any red or pink pigment when illustrating the mouth or worse, reserving a tube of ready mixed pigment labelled “pink” or “rose in the belief that it will always be a suitable hue for lips.
- Rendering an idealised portrayal of a mouth as opposed to what the eye really sees. For example: the mouth is pink, it is bow-shaped, it has dimples in each corner, both lips are equal in size and are symmetrical and all lips have a cupid’s bow. If the teeth show, all teeth are white and the gums are red, etc.
- Outlining the lips to represent where the edges meet the skin tone where no lines can actually be seen.
- Failing to observe the actual colour of the lips which may contain other colours as well as red or pink.
- Insisting on painting in the lips even though it cannot be seen from certain angles or lighting, resulting in lips that look transposed onto the face.
- Guess-working how the lips look due to poor photographic reference.
- Painting the mouth as if facing the viewer on a portrait that is at an angle.
- Forgetting to observe the flesh around the lips, and treating it as the background to the lips.
Other issues could be failing to sensitively observe the elements within a partially open or smiling mouth, such as the teeth, gums and the tongue. A common mistake is painting the teeth as white and square, and then edging them with black, making them look flat and harsh. The tongue, due to its foreshortening aspect, often causes the artist to fuss over the area, making the cavity of the mouth look full.
How to Paint a Realistic Mouth in Portraiture
Painting a realistic mouth can be achieved with the following painting tips:
- Tackling the mouth after the eyes and the nose could result in a rushed effort due to tiredness. Rather than risk ruining the portrait, leave it until the next painting session.
- Use good photographic reference to help do the painting justice.
- Try to override what the brain “knows” about mouths and what they “should” look like and view the mouth without labels. Turning the painting and photo upside down when painting will help the brain see the mouth as an unfamiliar shape. This will encourage sensitive observation when painting.
- Mix the colours for mouths from scratch rather than from premixed colours from a tube. Look for unexpected colours. Some mouths have bluish highlights, or contain ochres, greys, violet, or even green. Some mouths are the same colour as the skin.
- Mouths are rarely symmetrical. Some are lopsided or irregular in shape. Beware also of portraying the lips as though facing the viewer when the rest of the face is at an angle.
- Lastly, don’t treat the area around the mouth as mere background. The flesh around the cheeks and chin contains ridges and troughs like the mouth itself.
The elements within the mouth can be surprisingly dark and subdued. The teeth often require a mixture of blue and brown with the white. Linear aspects, such as the outline of each tooth should be avoided. It is best to soften lines with a little blending. Avoid also of reinforcing the outline of the mouth unless it wears striking lipstick. The division between mouth and surrounding skin is often very subtle, pale or nonexistent. Blending the divisions will help make the mouth look more like part of the face.
The key to achieving a realistic looking mouth is being honest about what can be seen. Rendering a little detail and a lot of blending will suggest form. This is often better than trying to illustrate it the mouth in a linear way. If the mouth does not look right, tonk the layer off and glaze another layer of paint on top once dry.
 |
| click to buy from Amazon |
Links on Portraiture
No comments:
Post a Comment